*Sponsored content from EasyMerchant Ltd.
Replacing old cast iron soil pipes can be a daunting prospect, so EasyMerchant have put together some information that'll help you get to grips with the task at hand.
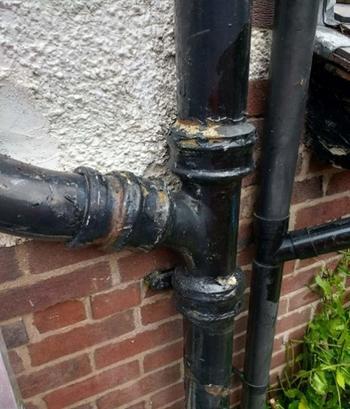
A cast iron soil stack generally looks good on the outside of a property, but with some original pipes now over 100 years old, they can pose a problem if you're making plumbing changes inside. It's not impossible to connect into an old soil pipe - but the rigidity and often awkward sizes make it extremely impractical.
So, if you're connecting new waste pipes, it's almost always easier and cheaper to replace old pipes with new plastic soil and vent system products.
Replacing an old soil pipe - where to begin
The first step involves removing the existing soil and vent branch and pipes, but before you start, it's a good idea to take a photo or make a detailed diagram of the system you're replacing. This original stack is likely to have been installed according to building regulations so unless you're completely overhauling the plumbing within the home, it's best not to alter the branch layout too much.
If you've never handled old cast soil pipes before, it's important that you're aware of how heavy they are. Even when broken down, removing the stack is likely to be a two-person job at least, and people often choose to use a small scaffold tower or mobile tower to make sure you've got a sure footing as it comes down.
At this stage, it's vital that you check in with your insurer to make sure you're ticking the boxes they require. Both buildings and professional liability cover providers may want to have a say about how you go about this task, so you should always make sure you've covered.
Important: block access to the underground drainage system
Before the full stack comes off the wall, you should strongly consider using an angle grinder or dedicated soil pipe cutter to remove a small section of the soil pipe before the point it enters the ground.
You'll generally find that the pipe itself is bearing little or no load, so you'll be able to cut a small section out without compromising the overall stack, which will remain fixed to the wall for now. When this section is removed, promptly cover it securely. There's a very good chance you're going to create debris as the stack comes off the wall and if it ends up in the drainage system, you can spend a small fortune having it professionally removed.
Dismantling and removing the soil pipes
There are different schools of thought when it comes to actually getting soil pipes off the wall, and the route you take is ultimately up to you and your insurers.
The first approach involves brute force. With a solid footing, the cast wastewater soil pipes will break with enough force from a lump hammer - there will generally be little resistance from any fixings, so they'll pry out of the wall. Needless to say, staying out of harm's way is paramount, so you shouldn't employ this solution if you're at all uncertain about what you're doing or being confident that everything around you is safe.
A more considered approach involves using a grinder or pipe cutter to remove the soil pipes section-by-section. This is likely to be more time-consuming ─ and you shouldn't underestimate how heavy each small section will be ─ but this is a more predictable and considered approach.
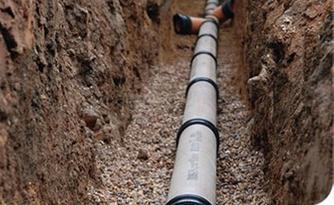
Excavating the clay soil pipe
At some point, the iron waste pipes you're removing will connect to clay soil pipes that are part of the underground drainage system. To make the task as clean and tidy as possible, you should connect directly to this clay pipe.
Generally, this will mean a little excavation - although the connection to the clay pipe won't be much more than a few inches deep. Allow yourself enough space to make a clean cut to break the joint between iron and clay - again remembering to make sure no debris enters any drainage systems.
Installing new waste pipes
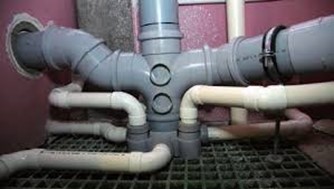
With your home stripped of old soil pipes, you can now refer back to your initial photos or site diagrams and use these to help you plan your new stack. Working to scale, you should start with any toilet pan connectors, then work your way down the building considering any wastewater collection points along the way (bath, sinks, shower, washing machine,etc).
Whether you opt for push fit soil pipe or solvent weld products at this stage is up to you - most merchants carry a wide range of both - and you'll be able to find pipes, branches, and fittings in a variety of colours to suit a range of properties. Your diagram doesn't just make it easier to visualise how the finished job will look and connect to drainage services - it's also a huge help in planning out the exact products you need too.
Connecting plastic pipes to underground clay water drainage
Unfortunately, at the time when many of the UK's clay drainage pipes were being connected to the sewer, there was no standard internal diameters for these pipes. As such, there can often be a difference of over an inch between different property's waste pipes.
The good news is, manufacturers have factored this in when creating connection types. Although you're potentially going from a 110mm drainage pipe or branch into a 160mm external diameter clay pipe, you've got a choice of products. The first is an external rubber connector with jubilee clips at both ends - allowing you to make an air- and water-tight connection to both waste pipes.
Alternatively, you could use a universal adaptor that sits inside the clay pipe you've exposed. A connection like this is generally suitable for both push-fit and solvent weld systems - and has a series of fins that grip the inside of the clay pipe, ensuring a tight fit.
As long as you're using kitemarked products, durability shouldn't be an issue as these fittings and sewer connection will be concreted into the ground.
Building your soil pipe stack
Needless to say, putting the new plastic soil pipe stack together on your site is a huge part of the overall job, but it’s infinitely easier if you've mapped out the original stack and planned how you're going to connect your soil pipes to the sewer.
Remember, whether you're working at height or ground level - original iron pipework and branch sections are exceptionally heavy. Always work safely using the correct PPE - and always over-estimate how heavy old pipework is going to be - even experienced builders can be caught out.
See the EasyMerchant supplier directory page for more information and the latest special offers available exclusively to FMB members.
*Disclaimer: This blog post is sponsored content, which is independent of the FMB. Publication does not constitute endorsement or recommendation from the FMB.