It’s the most wonderful time of the year, but if you’re in the middle of a renovation or building work, it can be hard to get into the mood for decking the halls if you are battling dust, mess and waste. So, in the Christmas spirit of clearing out clutter and adding some love to your home, we’re looking at some easy DIY projects to help you get your home ready for Christmas, while putting to good use some of the DIY materials you already own.
1. Get a door garland up with nails and wire
If you have some basic DIY supplies lying around, you can make a great first impression with a Christmas garland arch.
You could simply attach pre-made Christmas garland around your door frame with drawing pins or command hooks. But if you have a little time and some spare decorations, why not go large?
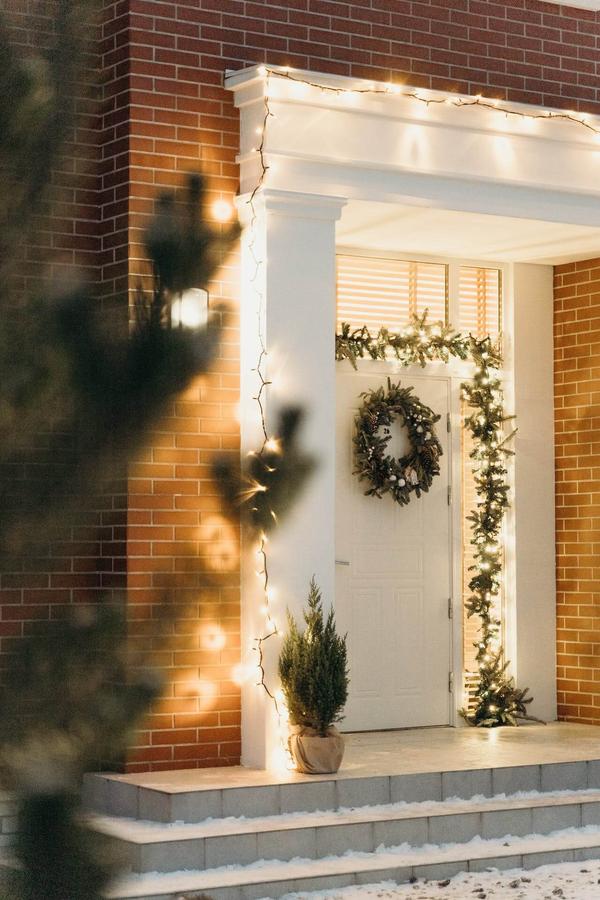
Take a tip from the professional event decorators and use chicken wire as your base. Wearing safety gloves and goggles to protect from stray clippings, use wire cutters to snip your chicken wire to size. This could be panels to surround your door, or cylinders to create columns. Use cable ties or string to secure your chicken wire base around your front door – if you don’t have anything to secure them to, it will help to have screws or eye hooks drilled in place (see our drilling tips below).
Next, the creative part – securing the decorations and lights to the chicken wire. You could go for evergreen foliage foraged from your garden, faux garland or go for an opulent bauble-only look.
Alternatively, if you have a porch or frame around your door, you could try the viral tension rod hack. Take an inexpensive shower pole or extendable wardrobe pole and set it up in your archway, door or window recess. Start with it at an accessible height while you decorate. Coil garland around the tension pole, add battery operated lights and decorations. Then, simply slide your tension pole up into position.
2. Upcycle ornaments with leftover paint
Give old baubles new life with leftover paint – this easy DIY craft is great for adding a dash of personality to those plain shatterproof baubles we all have mixed in with our collection. The added benefit being that if you’re using old house paint, it will co-ordinate brilliantly with your décor.
Simply give an old tin of paint a good stir. Make sure there are no bubbles, then slowly half-dip baubles into it. Hang your bauble up to drip and dry. Then simply add a new ribbon and hang on your tree.
This works best if you have a few inches of paint left in a large tin, rather than using paint samples, as you will need to dip the bauble rather than dab paint on, to give it a smooth finish.
While you have the paints out, why stop there? If you have a random collection of old Christmas ornaments (mismatched deer, a snowman that doesn’t fit with your theme perhaps) you can pull together a unified look by dip-painting them all in co-ordinating colours and grouping them together. This works best on hard or glittery surfaces – like old ceramic ornaments. If it’s looking patchy after one coat, allow to dry then give them another dip. Using leftover paint or old paint samples will cost nothing and take minutes.
3. Get crafty with wallpaper offcuts
Keeping a spare roll of wallpaper when you have finished decorating is a good idea as it can save you the cost of repapering entirely if the worst happens, such as a leaky water pipe, scuff mark or a toddler with a felt tip pen. But if you have surplus to spare, why not use some of it for some DIY Christmas décor?
The simplest decorations to make are round fans. Make them in different sizes and group together for a cost-effective wall display, hang from windows, doorways or the Christmas tree.
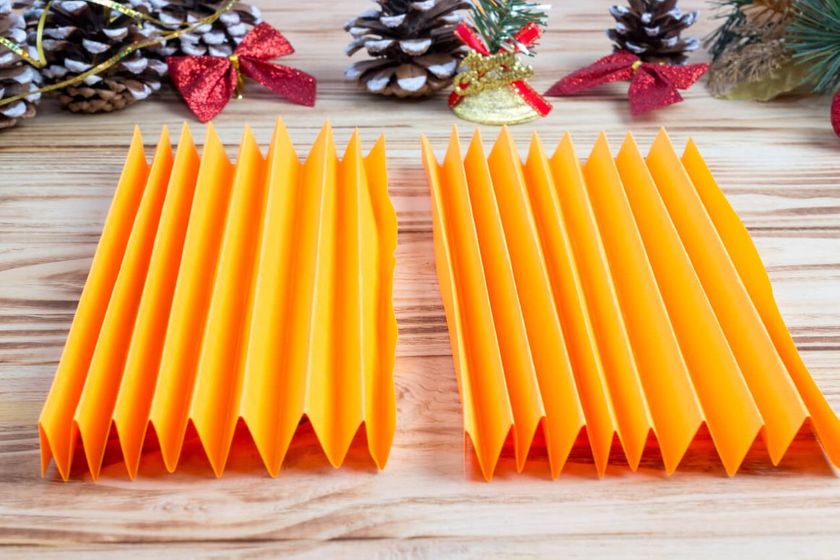
Create a paper fan decoration - Step 1
Create a paper fan decoration - Step 2

Create a paper fan decoration - Step 3
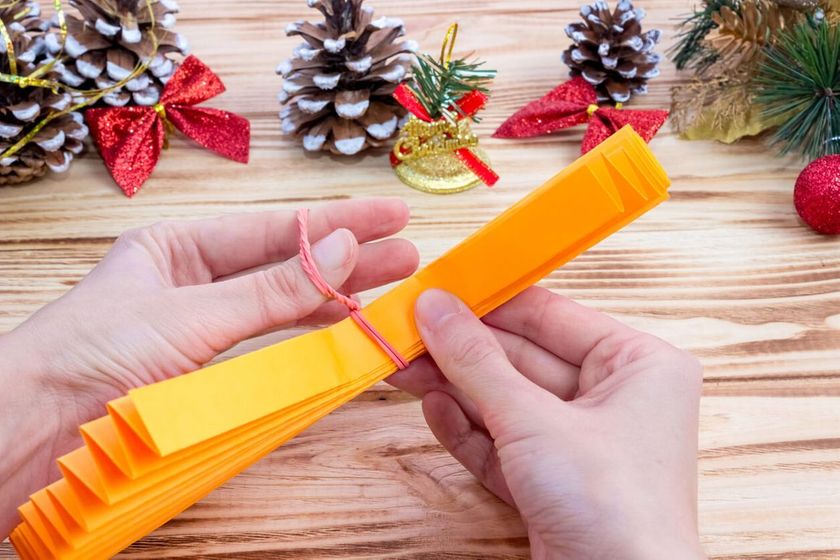
To get started, cut a section of wallpaper that’s twice as long as it is wide. Fold it into a concertina (it doesn’t matter too much how wide the folds are). Once it’s folded into a long rectangle, fold it once in the middle (this will be the centre of the circle) and tie a long piece of twine or ribbon around the centre – it needs to be long enough to hang the fan up.
Glue the two sides together, sandwiching the twine/ribbon along the length – a glue gun is ideal for this as it doesn’t saturate the paper. Weigh your folded fans down or add a paperclip to keep the glued sides together and allow to dry for a few hours. Once dry, you can trim the outer ends to make them more petal shaped, fan it out and hold it together with paper clips as, ideally, you don’t want to glue the other side – this will allow you to fold your fans down again to use next year.
Other Christmas ideas for leftover wallpaper:
- Large origami stars
- Christmas trees
- Paper angels or fairies
- Paper chains
- Homemade gift bags
4. Repurpose your leftover tiles
There are lots of ways to use up leftover tiles from your bathroom, kitchen or tiled floor project.
If you have kids, get them involved with personalising their own drinks coaster. These would make treasured Christmas gifts for grandparents, as well as keeping them occupied for half an hour!
Using ceramic pens, they can draw around their hands and doodle different snowmen or reindeer on each finger, draw Santa or a Christmas scene. If you follow the manufacturer’s instructions, ceramic marker pen can be cured in the oven for a more durable finish. Add felt pads to the bottom if you want to protect surfaces.
Here’s a more grown-up project. Did you know how easy it is to add printed images to your tiles? You will need access to an inkjet printer to print your chosen image onto standard printer paper – this won’t work with LaserJet images. You’ll also need a bottle of transfer medium – for example Mod Podge photo transfer medium or similar.
Instructions are usually included with the medium, but the process simply involves applying a thick and even cost of the medium to the tile, applying your photo face-down and allowing it to dry before soaking the paper off.
You will need to add a sealant to your finished tile to prevent the image from wearing off, and you will also need to take care to print any text in mirror view, as it will be reversed when applied to your tile.
You can also use the medium on wood, fabric and glass – so you can get plenty of use out of it.
5. Don’t let cardboard go to waste
The great thing about cardboard, is that it looks a lot like gingerbread. So, if you have packaging leftover from building materials and deliveries, all you need are scissors, paint pens and possibly some ribbon and glue to whip up some waste-conscious Christmas décor for your home.
String together shapes to make a garland or hang them from your tree, here are some ideas to get you started:
- Gingerbread men garland
- Turtle doves
- Gingerbread house
- Christmas bells
- Choir of angels
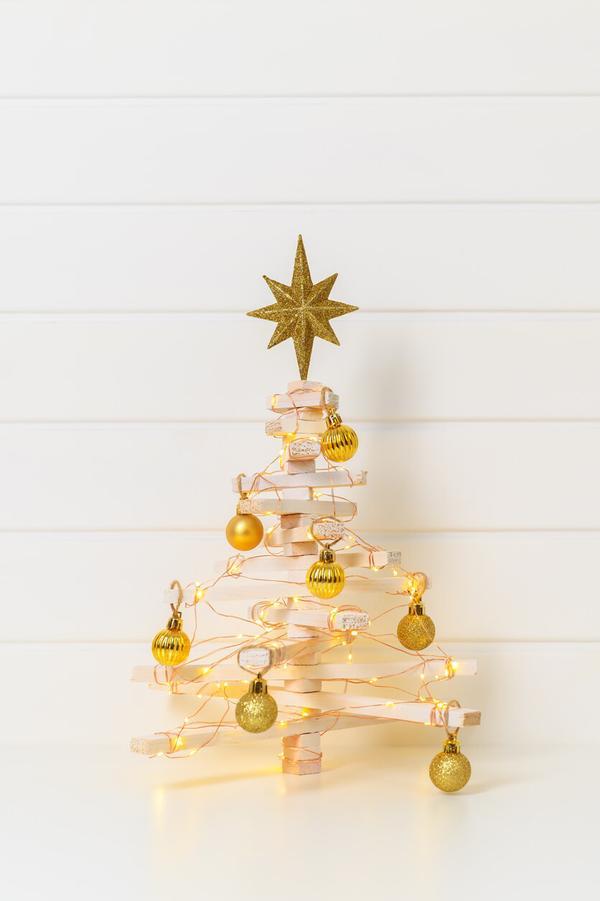
6. Round up your offcuts of wood
If you have a few power tools on hand, or even a handsaw and some sandpaper, there’s lots to create with offcuts of wood for Christmas.
Sand and paint thin lengths of wood, stacking or stringing them into a Christmas tree shape that you can use to display cards and tree ornaments. You can also trim chunky lengths into blocks, sanding and painting them with elf or snowman heads and bodies to stack up.
Alternatively, saw into simple house shapes, sand and create a Christmas village of quaint cottages or smart townhouses with paint samples and paint pens. Don’t forget to paint on some Christmassy touches like snow, Christmas trees in the windows and colourful lights. If you have some wood glue, you can add detail with roofs and chimneys, but it’s not essential.
Last but not least, as mentioned above you can also transfer images to wood – meaning you can create just about any design on wooden blocks or board with an inkjet printer and transfer medium.
Tips for drilling into masonry
- Get the right kit: Ideally, use a drill with a hammer function – meaning it taps into the masonry at the same time as rotating the drill bit into the wall. A corded drill can be preferable to a cordless drill, as it can provide more power.
- Choose a masonry drill bit, rawl plug and screw of matching size. You will also need to choose another smaller drill bit to drill an initial pilot hole. As an alternative to screws, you could use screw eyes – which give you a hoop to tie your garland on to.
- Safety first: Check for pipes and electrics in the wall using a detector – to avoid running the drill into any hazards.
- Measure up: Measure where you want the screw to go – think about how much space you need around it. Make a mark on the wall and dig your drill bit into the wall slightly to create a notch to drill into (this will prevent the drill from sliding around).
- PPE is essential: Put on safety goggles, gloves and a face mask for protection and to prevent inhalation of dust. Make sure there are no hazards in the way like children, pets and protect items that might be damaged or get messy – like rugs and curtains.
- Get drilling: Start by using the smaller drill bit to drill the pilot hole. Make sure your drill is level with the floor and at 90 degrees to the wall to ensure a straight line into the masonry. Use a slow speed setting and drill to the length of the screw you intend to use – you can mark the length on the drill bit with some masking tape.
- Swap to the larger drill bit and repeat the process, using the pilot hole to guide you. Hoover up the dust.
- Add a rawl plug: Tap the rawl plug into the hole using a hammer, so it lies flush with the wall and doesn’t stick out.
- Add a screw: Use a screwdriver to insert your metal screw into the rawl plug. You can add a picture hook, or ties to secure your festive decorations in place